Step 1
Provide Accounts Payable with the completed IRON MOUNTAIN INITIATION FORM. Please ensure the Activity Number that the archiving will be charged to is filled out in the form.
If your activity number does not have the required budget for archiving and expense eligibility, your SRFA will contact you to request another activity number that can be used. If you do not know of any others, please work with your SRFA to find an appropriate Activity number, the SRFA can suggest some to you.
Once the appropriate activity number is determined, you can proceed with Section 2.
If the research team already has a business account skip to Section 2.
Step 1
The Research Team will need to create a Business Account with Iron Mountain. To do so, please send Accounts.Payable@unityhealth.to (for questions: Kuber.Bista@unityhealth.to), your completed NEW SERVICE INITIATION FORM.
Step 2
Accounts Payable will review to ensure the form has been completed correctly, and get back to you in 4-5 business days. If you have questions about the status of your form and account, you can contact the AP Analyst Kuber Bista at Kuber.Bista@unityhealth.to.
Once the account is opened up, Accounts Payable will connect you with the Database Analyst in the Health Records Department (Fernando.Antunes@unityhealth.to) to set up your new user access.
Continue to Section 3.
If the research team has a business account, but wants a new team member/user added to it. Otherwise skip to Section 4
Step 1
Contact the Database Analyst in the Health Records Department (Fernando.Antunes@unityhealth.to) to request new user access to the Business Account. You will need to provide the following information:
1. Recall/IM account reference number.
2. User Account setup requirements: Full name, contact address details [including Postal Code], also please include direct contact number and email address.
3. Lastly, you must include your department head, manager, or authorizing body in this request. Typically, these requests should come from them, but a quick reply from them approving will suffice.
Step 2
Once the new user setup is complete, in 2-3 business days the user will receive a system-generated email to complete the setup. They can log in at: https://www.ironmountainconnect.com
Once the user accounts are setup
Step 1
Contact Iron Mountain to inform them of your archiving needs through https://www.ironmountainconnect.com and follow the directions on the site.
Alternatively, you can call 1-800-934-3453, and a customer service rep will be able to help you. You will need to provide your Customer ID, and Division ID.
Step 2
Iron Mountain will send you empty boxes and labels for you to prepare your document storage.
Step 3
Prepare your boxes following these instructions:
Step 4
Once prepared, you will need to contact Iron Mountain for pick up.
Step 5
You should create a regularly updated log/spreadsheet, available for your manager, in case they need to retrieve boxes while you are away.
It should contain at minimum:

You can use this template: Iron Mountain Archiving Tracking Log.xlsx
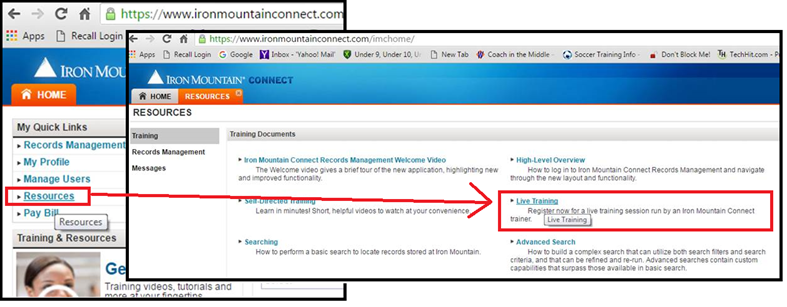
Iron Mountain training can be accessed through the website, after logging in: